Cat's Cradle
Contributed by Michael Bourne (diverti@globalnet.co.uk)
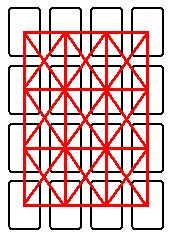
Layout
From the top of a 52-card pack, lay out sixteen cards in a square formation, four by four, setting out the cards from left to right and from top to bottom. The remaining 36 cards form the stock.
This layout is made up of a total of eighteen straight lines (marked red in the diagram): four horizontal lines, four vertical lines and two diagonal lines, each of these ten lines containing four cards; four diagonal lines of three cards; and four diagonal lines of two cards.
Aim of the Game
To use up all the remaining 36 cards in the stock.
Rules and Method of Play
i. Only one card can be moved at any one time. This card may be either a singleton or a top card or subsequently revealed card in a stack.
ii. A card may be moved only on to a card which is opposite in colour and of one higher rank, (e.g. K![]() on A
on A![]() , A
, A![]() on 2
on 2![]() ).
).
iii. A card may be moved only on to a card that is also positioned on one of the same vertical, horizontal or diagonal lines indicated above, but it may be moved in any direction along these lines. A card may not be moved into a space.
iv. During a sequence of play, a card may be moved more than once provided that it is via a card of opposite colour and of one rank higher, and on to a card of the same colour and rank. (See iii. in the example, below.) This kind of move is quite common. It enables a card to reach other lines and to bring into play other cards in the layout.
v. A sequence of play consists of moving around those cards that can be moved and creating spaces in the layout. In the process, stacks of cards are built up. When a player reaches the point of being unable to create any more spaces, the new spaces in the layout are filled in with unseen cards from the top of the stock. After the spaces have been filled in from left to right and top to bottom, the next sequence of play commences.
The game continues until no spaces can be created during a sequence of play, or all 36 cards from the stock have been successfully played.
(Remember that the more spaces you are able to create in a sequence of play, the more cards you will use up from the stock. The ability to create as many spaces as possible will increase with experience and the application of the techniques set out below.)
Example of a sequence of play for this initial layout.
| J | 9 | 8 | 3 |
|---|---|---|---|
| Q | A | 9 | 9 |
| 7 | Q | 2 | 2 |
| 4 | 4 | 6 | 6 |
i. A move with no option. J![]() on Q
on Q![]() .
.
ii. A move with an option. There is a choice to be made with the 8![]() which may be placed on the
either the 9
which may be placed on the
either the 9![]() or 9
or 9![]() . (Tactically, with the 6
. (Tactically, with the 6![]() being in a favourable position, the 9
being in a favourable position, the 9![]() would be
preferable.)
would be
preferable.)
iii. A move involving a transfer. The 3![]() , having been moved on to the 4
, having been moved on to the 4![]() , may now be transferred on to the 4
, may now be transferred on to the 4![]() . This now enables first, the 2
. This now enables first, the 2![]() to be moved on to the 3
to be moved on to the 3![]() , and second, the A
, and second, the A![]() to be moved on to the 2
to be moved on to the 2![]() , so that a four card stack A
, so that a four card stack A![]() , 2
, 2![]() , 3
, 3![]() and 4
and 4![]() is formed.
is formed.
In this sequence of play, five spaces have been created.
Further examples of the method of play and the way in which cards may be moved around are contained in:-
Playing Hints and Techniques
By applying the following, various techniques and tactics, the chances of success are greatly increased.
- To get a better view of any lines of play that require a bit of thought, identify and play first those cards for which there are no optional moves.
- When options occur, it is usually better to clear cards from the four central positions, (see
EXAMPLE, below). These positions command more lines in the layout. Alternatively, since these four
positions are also more likely to receive cards, occasions arise when it may be preferable to use
them as bases on which to build stacks of cards in large numbers.
3EXAMPLE (x denotes cards of no consequence.) 8 
3 
4 
x x 3 10 x 9 x x x x x 9 
8 on 4 (rather than 3 on 4), but,
8 on 9, 9 on 10 (rather than 8 on 9), to avoid "blocking", (see below).
- Blocking. When two stacks of cards are each topped by two cards of the same colour and rank, those two stacks become blocked in as much that the top cards cannot now be released, although cards may still be moved on to them. If blocking is unavoidable, it is usually better to have two blocked stacks on the same line, if possible, so that they act together and allow for possible transfers of future cards. In the completed sequence of play in EXAMPLE 5 below, blocking occurs with the A and A. However, both cards are co-operating together on the same line, ready to receive a black king and allow it to be transferred from one ace to the other and thence, perhaps, to pick up a red queen.
- Watch out for opportunities of making use of a card for other purposes before moving it. These
occur frequently.
10EXAMPLE x x J x x x x J Q x x x x x 10 x on J and transfer on to J; then J on Q.
- Some layouts, at first sight, would appear to offer no possibilities of a move. Take a good look before giving up.
In this sequence, the moves are a. AEXAMPLE x 2 x 10 J x x A x x x x 10 /JA /2x Q on 2, A on 2, (although this unfortunately creates two blocked stacks), and b., not 10 on J, 10 on J, in the same way, as in a), but 10 on J, J on
Q, 10 on J for three spaces in total.
- Complicated configurations of cards often turn up. Care must be taken to work out the best line of play in order to create the greatest number of spaces. The best line of play can be assessed by studying, for a while, the cards in the layout. Here are a couple of not too complicated examples:
It is simple enough to play 2EXAMPLE I 2 3 x x x 2 x A x x x K x x x x on 3 and K on A for two spaces, but the best line of play is A on 2 and transfer on to 2, 2 on 3, A on 2, K on A, creating three spaces and still clearing a central position.
An inexperienced player might play 4EXAMPLE II 8 x x 6 /77 /85 /46 /5x x 9 4 3 x x x x on 5, 3 on 4 and leave it at that. Perhaps with a little
more experience, 7 on 8, 8 on 9, would be spotted, and even 6 on 7, 7 on 8, so as to create four spaces. The best line of play, however, is 4 on 5, 3 on 4, 7 on 8, 8 on 9, 6 on 7, 7 on 8, 5 on 6, 4 on 5 - giving five spaces.
- Clearing a stack to create a space. Clearing a stack of two cards is common, three occurs
occasionally, but four is quite rare. Opportunities to clear stacks of three and four need to be
looked out for. (Remember, only one card at a time may be moved.)
5EXAMPLE x 7 x x x x 8 /7/6/5x x x x 9 8 x 6 x on 6, 6 on 7, 7 on 8, 8 on 9, creates one space - and a lifeline if, at first, the game had appeared to have come to an end.
- Optional Moves and Preparation. In this layout there is the option of moving A on to 2 or 2:
Here, Ax 2 x x x A x Q x x 10 x J x x 2 on 2 is a far better move and prepares for the eventuality of K or K turning up in a
succeeding sequence of play so as to enable Q, J and 10 to be picked up.
In addition to the above, there are a number of advanced techniques and finer points of play. Some of these are to do with controlling lines of play, calculations based on cards that have yet to emerge from the stock, (8, above, partly comes into this category), and targeting certain spaces for certain cards. The more the game is played, the more players will come to realise and appreciate the skill factors involved. Certainly, Cat’s Cradle can throw up many intricate and challenging sequences for players to solve.
Some statistics based on thousands of games played.
- Longest winning sequence - 11.
- Longest losing sequence - about 17.
- Most number of spaces created at the end of a successful game - 9 (at least six times).
- Chances of not being able to make a move on the first layout - very, very low, probably about a 200-1 chance.
- Chances of a successful conclusion - on average, about one in eight for a beginner; for an experienced and skilled player - about one in five.
Copyright © Michael Bourne, divertimenti (UK) 1986 & 1999.
Enjoy the game. Comments and enquiries welcome.
MICHAEL BOURNE, (current C.C. world champion), diverti@globalnet.co.uk